This article will be part of a bigger topic, where I will also show how to use Authentik to secure a self-hosted note taking app with 2FA (2 Factor Authentication), but since the Authentik setup itself ended up being quite long, I thought I’d publish it separately.
Why Authentik?
If you decide to run your own home lab, as you install applications, maybe even applications you’ve built yourself, at some point you might run into one of the following situation:
- you want to setup authentication for an application that does not have any form of authentication (e.g. Homepage)
- you want to publicly expose an application so you have access to it from anywhere and you would like 2FA (2 Factor Authentication) for security, but the application does not have this feature built in (e.g. Trilium, Portainer)
- you would like an SSO (Single Sign-On) solution for multiple applications in your homelab, so you don’t have to login into each one separately
Note: The features of the examples given might change with time.
This is where an authentication provider like Authentik comes in. If you’ve ever used a service like Okta, Authentik is similar, but it’s open source and you can self-host it if you want. I need to mention there is a relevant alternative in Authelia, but I haven’t tried it yet. Authelia claims to be much more lightweight, and to be honest that’s easy to believe as Authentik’s entire stack eats up about 900MB of RAM. I think that’s unjustifiably high for a system with zero load, just idling most of the time in my case.
So for now I chose to play around with Authentik mainly because of it’s popularity on Youtube and Reddit.
Install
We are going to install it using Docker Compose. The official page for the setup can be found here. However, I did do some things a bit differently and there are some things you need to be aware of, so keep reading.
Your Docker Compose file should look something like this:
services:
  postgresql:
    image: docker.io/library/postgres:16-alpine
    container_name: authentik-postgresql
    restart: unless-stopped
    healthcheck:
      test: ["CMD-SHELL", "pg_isready -d $${POSTGRES_DB} -U $${POSTGRES_USER}"]
      start_period: 20s
      interval: 30s
      retries: 5
      timeout: 5s
    volumes:
      - database:/var/lib/postgresql/data
    environment:
      POSTGRES_PASSWORD: ${PG_PASS:?database password required}
      POSTGRES_USER: ${PG_USER:-authentik}
      POSTGRES_DB: ${PG_DB:-authentik}
    networks:
      - authentik-network

  redis:
    image: docker.io/library/redis:alpine
    container_name: authentik-redis
    command: --save 60 1 --loglevel warning
    restart: unless-stopped
    healthcheck:
      test: ["CMD-SHELL", "redis-cli ping | grep PONG"]
      start_period: 20s
      interval: 30s
      retries: 5
      timeout: 3s
    volumes:
      - redis:/data
    networks:
      - authentik-network

  server:
    image: ghcr.io/goauthentik/server:2025.2.2
    container_name: authentik-server
    restart: unless-stopped
    command: server
    environment:
      AUTHENTIK_REDIS__HOST: redis
      AUTHENTIK_POSTGRESQL__HOST: postgresql
      AUTHENTIK_POSTGRESQL__USER: ${PG_USER:-authentik}
      AUTHENTIK_POSTGRESQL__NAME: ${PG_DB:-authentik}
      AUTHENTIK_POSTGRESQL__PASSWORD: ${PG_PASS}
      AUTHENTIK_SECRET_KEY: ${AUTHENTIK_SECRET_KEY}
      AUTHENTIK_EMAIL__HOST: ${AUTHENTIK_EMAIL__HOST}
      AUTHENTIK_EMAIL__PORT: ${AUTHENTIK_EMAIL__PORT}
      AUTHENTIK_EMAIL__USERNAME: ${AUTHENTIK_EMAIL__USERNAME}
      AUTHENTIK_EMAIL__PASSWORD: ${AUTHENTIK_EMAIL__PASSWORD}
      AUTHENTIK_EMAIL__USE_TLS: ${AUTHENTIK_EMAIL__USE_TLS}
      AUTHENTIK_EMAIL__USE_SSL: ${AUTHENTIK_EMAIL__USE_SSL}
      AUTHENTIK_EMAIL__TIMEOUT: ${AUTHENTIK_EMAIL__TIMEOUT}
      AUTHENTIK_EMAIL__FROM: ${AUTHENTIK_EMAIL__FROM}
    volumes:
      - media:/media
      - templates:/templates
    ports:
      - 4000:9000
      - 4443:9443
    depends_on:
      postgresql:
        condition: service_healthy
      redis:
        condition: service_healthy
    networks:
      - authentik-network

  worker:
    image: ghcr.io/goauthentik/server:2025.2.2
    container_name: authentik-worker
    restart: unless-stopped
    command: worker
    environment:
      AUTHENTIK_REDIS__HOST: redis
      AUTHENTIK_POSTGRESQL__HOST: postgresql
      AUTHENTIK_POSTGRESQL__USER: ${PG_USER:-authentik}
      AUTHENTIK_POSTGRESQL__NAME: ${PG_DB:-authentik}
      AUTHENTIK_POSTGRESQL__PASSWORD: ${PG_PASS}
      AUTHENTIK_SECRET_KEY: ${AUTHENTIK_SECRET_KEY}
      AUTHENTIK_EMAIL__HOST: ${AUTHENTIK_EMAIL__HOST}
      AUTHENTIK_EMAIL__PORT: ${AUTHENTIK_EMAIL__PORT}
      AUTHENTIK_EMAIL__USERNAME: ${AUTHENTIK_EMAIL__USERNAME}
      AUTHENTIK_EMAIL__PASSWORD: ${AUTHENTIK_EMAIL__PASSWORD}
      AUTHENTIK_EMAIL__USE_TLS: ${AUTHENTIK_EMAIL__USE_TLS}
      AUTHENTIK_EMAIL__USE_SSL: ${AUTHENTIK_EMAIL__USE_SSL}
      AUTHENTIK_EMAIL__TIMEOUT: ${AUTHENTIK_EMAIL__TIMEOUT}
      AUTHENTIK_EMAIL__FROM: ${AUTHENTIK_EMAIL__FROM}
    volumes:
      - /var/run/docker.sock:/var/run/docker.sock
      - media:/media
      - certs:/certs
      - templates:/templates
    depends_on:
      postgresql:
        condition: service_healthy
      redis:
        condition: service_healthy
    networks:
      - authentik-network

volumes:
  database: {}
  redis: {}
  media: {}
  certs: {}
  templates: {}

networks:
  authentik-network:
    name: authentik-network
If you want to check or use my exact setup, including backup, you can check it out on GitHub.
Let’s look at the services and what I did differently.
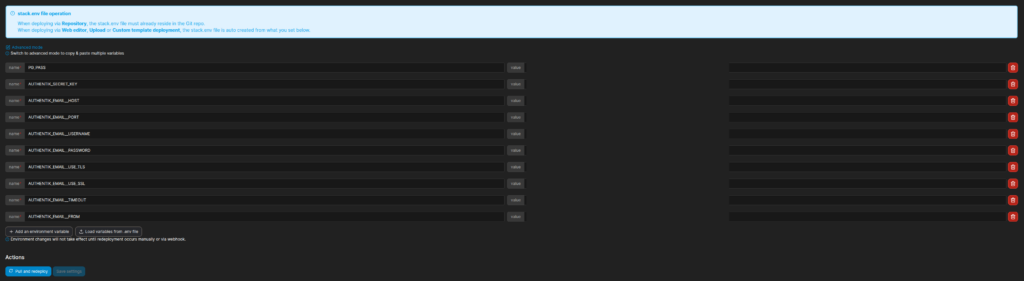
First, it starts a postgresql service and defines a health check for it. I gave the container a name, authentik-postgresql, which I always do. The official documentation advises you to use an .env file to pass in environment variables to your stack, but since I use Portainer and create/update stacks directly from GitHub I can’t because it would involve putting the .env file containing a bunch of sensitive info in a public Github repo. So I pass in the variables through Portainer when I create the stack. I also associate a Docker network to each of my stacks, so I also did that, in this case authentik-network.
Next up is the redis service, which also has a health check. It overrides the command to enable Redis persistence and to change the log level. Here, my changes are similar, I gave it a name and referenced the authentik-network.
The next 2 services, server and worker, are the actual Authentik services. They are quite similar in terms of configuration and they use the same Docker image, but they serve different purposes by starting a different command. The server service handles the communication with the UI, while the worker is focused on scheduled tasks. In the same way as before, I gave them appropriate container names and added them to the authentik-network. I simplified things a little bit by removing some of the configuration, related to the image name and version and port mappings, I’m fine updating those explicitly in the Docker Compose fine when needed. I also added all the environment variables mappings that they advise to put in the .env file, so I can set the values from Portainer. I also changed the folder mappings to Docker volumes, as I don’t have any use for folders on the host machine.
With my changes, passing in the variables with Portainer looks something like this:
Since we are on the topic of configuration, let’s talk about email sending next.
Email setup
If you look at the official documentation, they advise you to setup some email configuration, although they don’t specifically mention what for. My understanding is that this is used for:
- some user emails: account activation, password reset
- some authentication flows that involve emails
- system notifications
There are a couple of options I though of for email sending.
One option is to use an email provider, like Gmail. If you go down this path, you will have to setup an app password. Trying to use a Gmail account without 2FA will not work. Read about how to setup an app password here. For this reason I would advise you to create a Gmail account specifically for this, because your account becomes more vulnerable specifically through the app password. One other thing to note is that, at least for me, mails sent using this option went to spam. Once you mark them as non-spam you should be good, but if you want to onboard other users using email or use some email-based 2FA flows where you want to be sure the email is delivered, that might be a problem. So I think this option is fine for personal use, but not much more. If you decide to go with this option, here’s the configuration that worked for me:
AUTHENTIK_EMAIL__HOST=smtp.gmail.com
AUTHENTIK_EMAIL__PORT=587
[email protected]
AUTHENTIK_EMAIL__PASSWORD=your_app_password
AUTHENTIK_EMAIL__USE_TLS=true
AUTHENTIK_EMAIL__USE_SSL=false
AUTHENTIK_EMAIL__TIMEOUT=10
[email protected]
Another option is to use a mail sending service like MailChimp or MailJet, which offer SMTP integration (check their documentation for details). At the time of this writing both offer free tiers, which should be enough for this purpose and I imagine most similar services do too.
Starting and validating
Now you can start it either in Portainer or from the command line (depending on your setup), but I have an important note about your first access to Authentik. The official documentation states:
To start the initial setup, navigate to
http://<your server's IP or hostname>:9000/if/flow/initial-setup/.
My experience was that the host you use on your first access to this path is very important, Authentik will deny any other host for accessing the setup URL afterwards:

To take my concrete situation as an example, when I first started the docker compose stack, I wanted to check that it’s actually running properly and accessed it on http://<local-ip>:9000/if/flow/initial-setup/. Then I moved to setting up a DNS subdomain, but when I accessed it through https://authentik.example.com/if/flow/initial-setup/, it failed with the above error.
If you run into this, you can solve it by deleting the Docker containers and (importantly) the Docker volumes (or empty the folders if you use folder mounts) and redeploy the stack. This is basically a fresh reinstall.
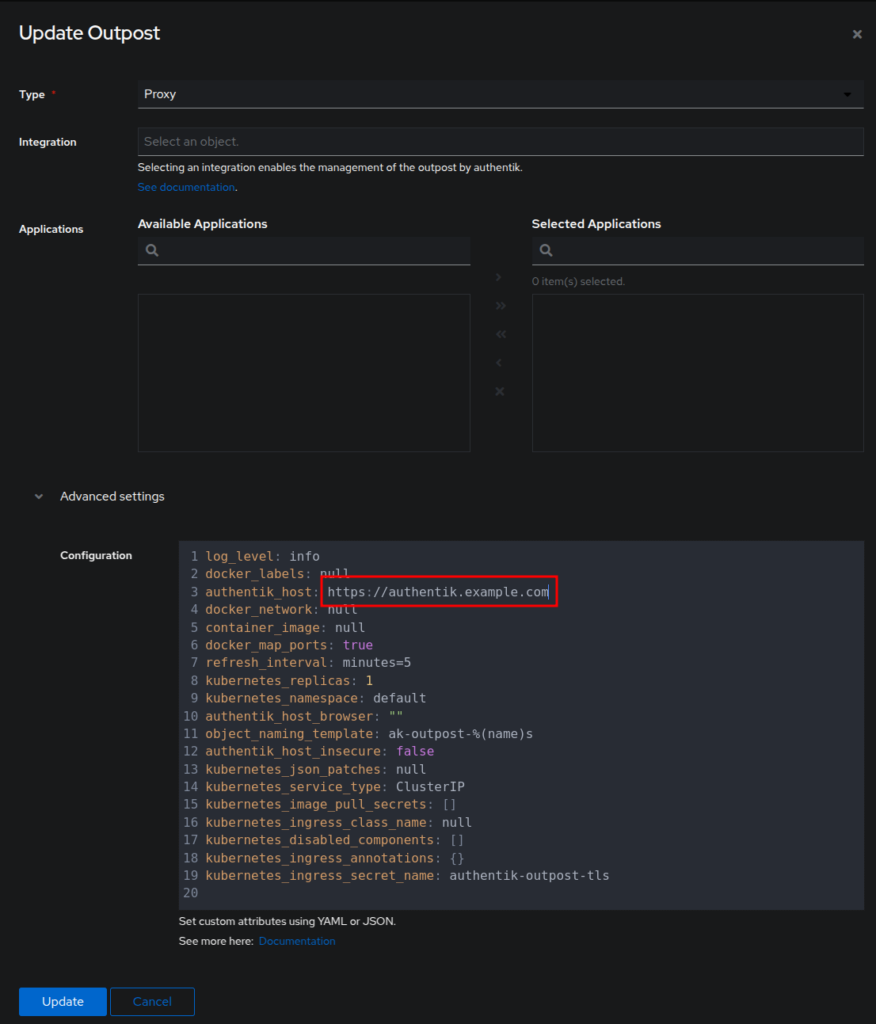
A more surgical way of doing this would be to complete the initial setup via the local URL, http://<local-ip>:9000/if/flow/initial-setup/, log into the admin console and go to Applications -> Outposts, identify authentik Embedded Outpost (should be the only one) and click the Edit button in the Actions column. In the screen that opens, click Advanced settings. In there you can edit the value of the key authentik_host to the host you want to actually use for access:
DNS and reverse proxy setup
If you want to use it for publicly rxposed services, Authentik itself will also have to be public. For this you will have to do 2 things:
- create a subdomain like authentik.example.com that points to your public IP (checkout my Cloudflare DDNS if you don’t have a static IP)
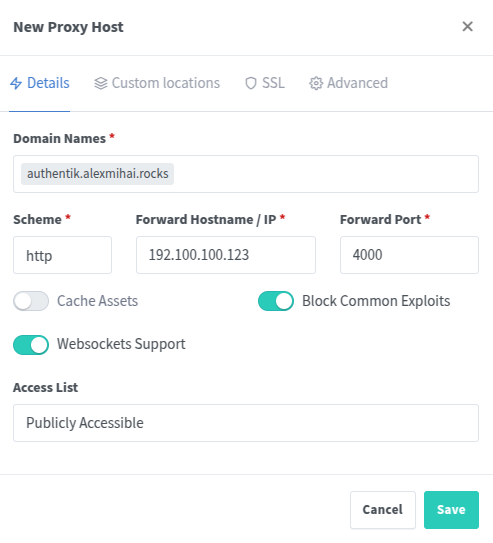
- create a record in your reverse proxy (I use Nginx Proxy Manager) that points to the service
If you’re interested in the type of setup I use, you can read this article. If you have something similar, first create the DNS record:

Then create the Nginx Proxy Host:
Initial setup
Now you can access https://authentik.example.com/if/flow/initial-setup/, which will present you with this screen.

Set your email address and password. You will then get logged into your user’s dashboard that shows no application. This is where the list of applications shows once you set them up. This first user is implicitly an admin. You can switch to the admin dashboard by clicking the ‘Admin interface’ button at the top right.
2 Factor Authentication
Ok, now that we have our user set up, let’s setup 2FA. There are multiple ways to do 2FA, I chose to do it via an authenticator app on my phone. I use Okta Verify, but any would do, it doesn’t matter (Google Authenticator, Microsoft Authenticator).
In Authentik, after you login, click the Settings icon on the top right of the screen (gear icon). Go to MFA Devices, click Enroll and choose TOTP Device. TOTP stands for Time-based One-time Password.
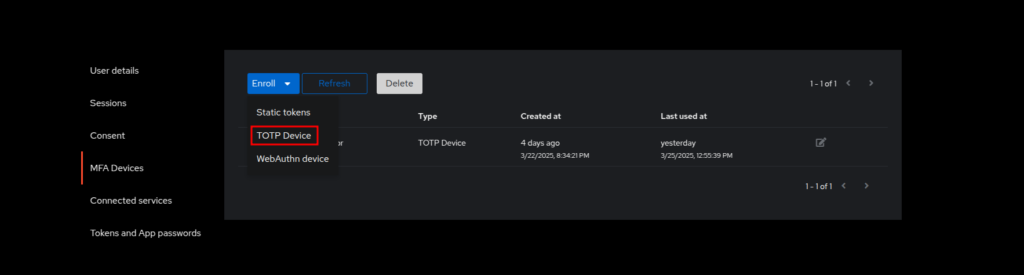
You will be presented with a screen with a QR code. In your authenticator app add an account and you should be presented with an option to scan a QR code. Scan the QR code and enter the code given by the authenticator app in the Authentik screen. Click Continue and you’re done.
If for some reason you can’t use the QR code, you can click the Copy button next to the QR code and paste it somewhere. That is a code that you can enter in the authenticator app instead of scanning the QR code.
You can now logout and on log back in. After the password you will be asked for the authenticator code.
Discord notifications for logins
If you’re cautious like me, you might want to also do the following setup. Since I’m the only one using this environment, I want to get notified of every successful or unsuccessful login attempt. I’m not a big fan of email notifications, but Authentik can use Slack or Discord webhooks.
First, set up your Discord channel and create a webhook. For that click Edit Channel next tot the channel name, go to Integrations > Webhooks and create a new webhook. Copy the webhook URL and and paste it somewhere for reference.
Log into Authentik and go to the Admin interface (top right button). Go to Events > Notification Transports and click Create. Give it a proper name that you will remember, for Mode choose Webhook (Slack/Discord) and for the URL paste the webhook URL you copied, but (importantly) append /slack at the end of it.
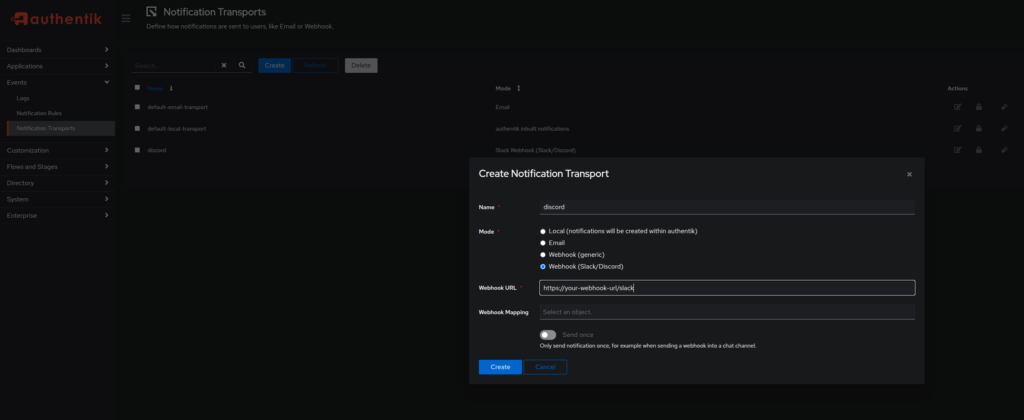
After you create the transport, you can test it by clicking Test in the Actions column. You should get a test notification in your Discord channel.
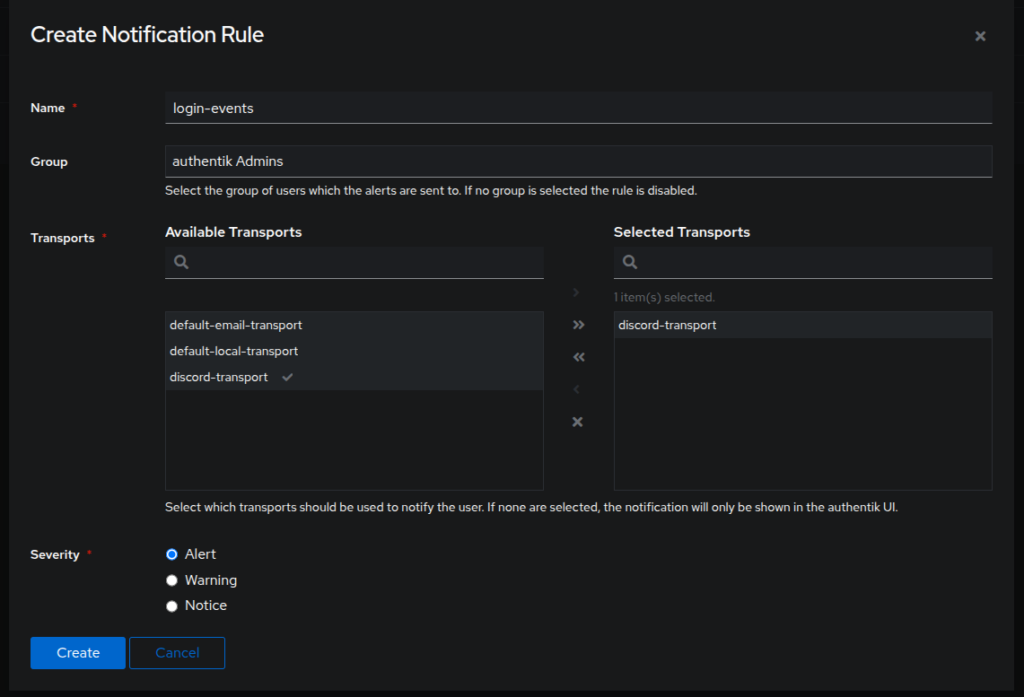
Now go to Events > Notification Rules and click Create. Give it a name, for Group choose admins and in the Available Transports choose the transport you previously created and click the right arrow to move it to Selected Transports. Click Create.
Now from the list of rules expand the newly created one and click Create and bind Policy. Pick Event Matcher Policy and click Next. Give it a name and for Action pick Login. Click Next.
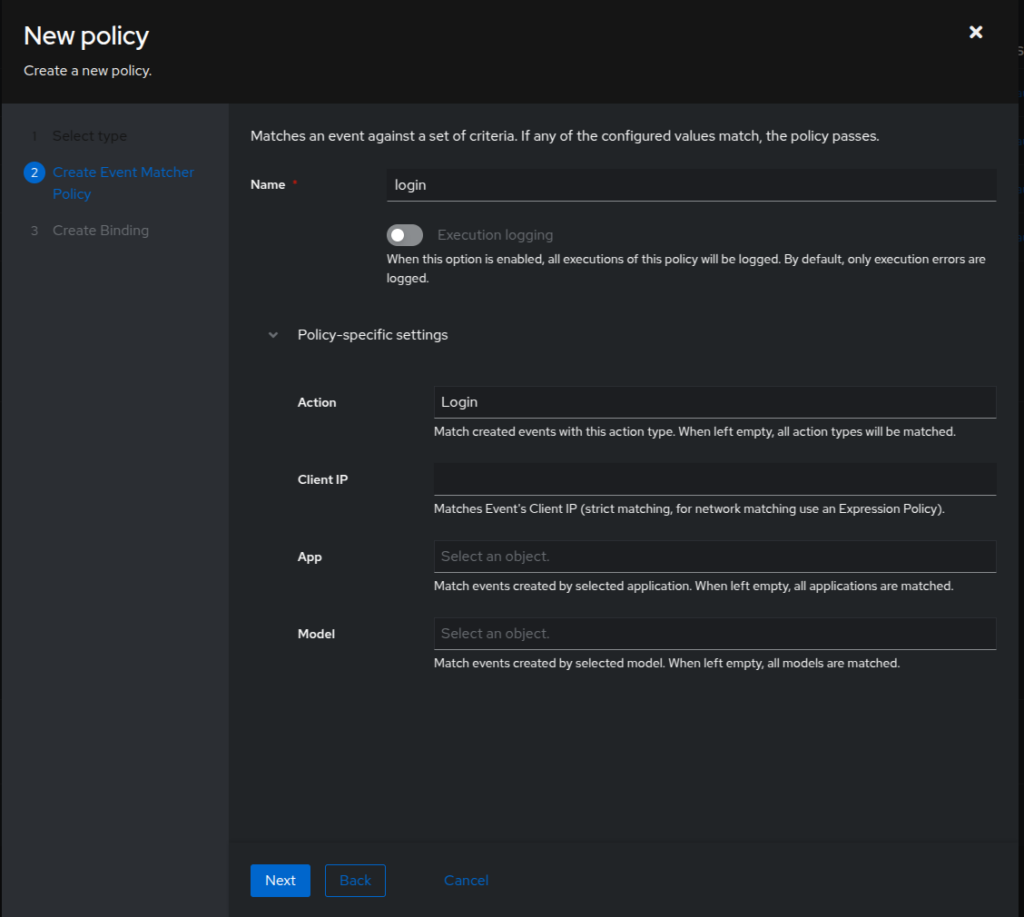
On the next screen, give it an Order of 20 and click Finish.
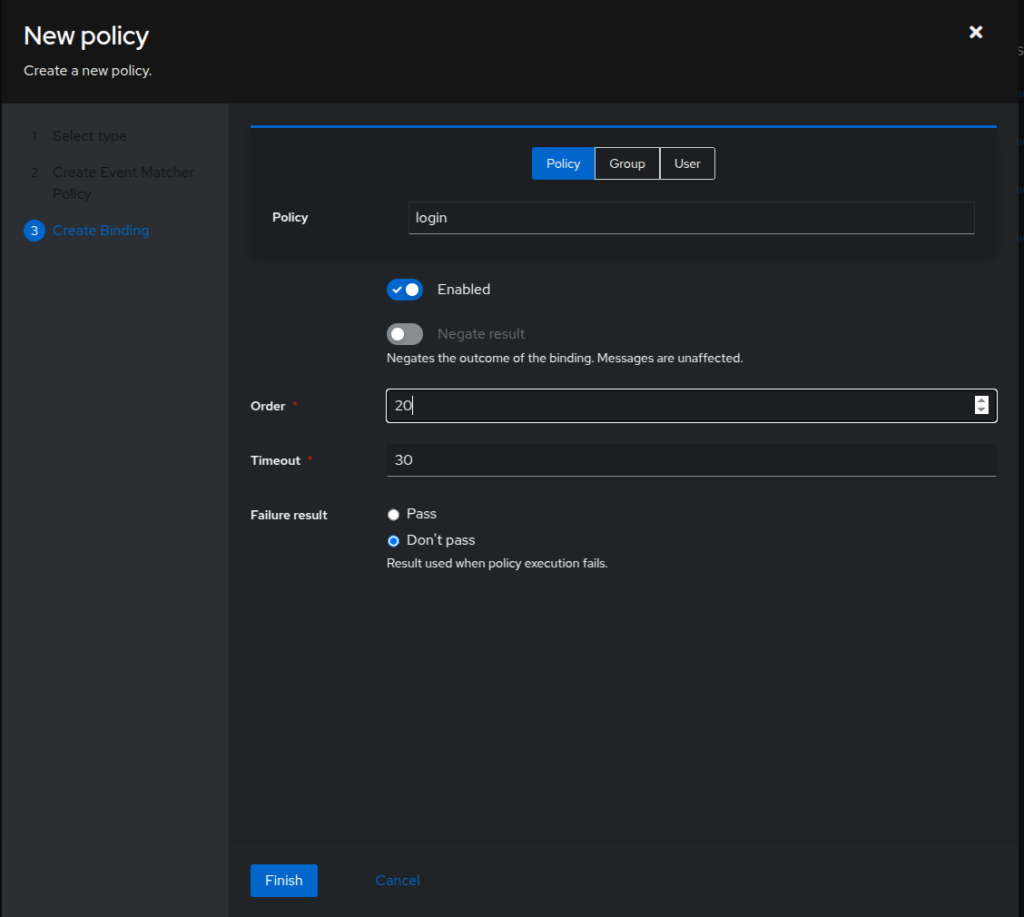
Click Create and bind Policy and go through the process again, only this time choose Login Failed for Action and 40 for Order.
You’re done, you can now test. Logout and try to login with invalid credentials. You will get a notification on your Discord channel. Then login with your valid credentials and you should get another notification.
Hope this helps, have fun clickity-clacking.
Sources
https://www.youtube.com/watch?v=O1qUbrk4Yc8
https://www.youtube.com/watch?v=Woq6o8skzxw
https://docs.goauthentik.io/docs/install-config/install/docker-compose
Leave a Reply