In a previous article I talked about setting up a k3s cluster for your homelab. Now it’s time to discuss about storage for your workloads.
Default behavior
If you followed my article, you now have a pretty vanilla k3s cluster. If you run a workload that requires persistent storage, say a database instance, you request it from the cluster by defining something like this:
apiVersion: v1
kind: PersistentVolumeClaim
metadata:
  name: mariadb-data
  namespace: vikunja
spec:
  accessModes:
    - ReadWriteOnce
  resources:
    requests:
      storage: 500Mi
Here we are defining a PersistentVolumeClaim of 500 MB, which subsequently can be used as a volume for some workload. But where does this storage come from? By default, the k3s cluster will provide it from the OS disk of the node running the workload. This has a few issues:
- It’s not resilient. If your disk breaks, the data goes bye-bye.
- You cannot move the workload. If you want to perform some maintenance on a node, you will have downtime, You can’t drain the node and start the workloads on other nodes because the storage is on the node that went down.
- Different workloads running on different nodes cannot share a volume. This also includes the case where you want multiple pods of the same application to access the same storage (for example multiple instances of a web server accessing a database).
Longhorn to the rescue
Longhorn makes it possible to have highly available persistent storage in your k8s cluster and it also gives you the possibility to easily perform backups and incremental snaphots of your volumes.
I will mention there is a notable alternative in MicroCeph, which is a lightweight version of Ceph, a professional grade distributed system for people running their own k8s clusters in production. But for a small setup like a home lab, Longhorn seems to be the more popular option. I haven’t tried MicroCeph, but I have to say that once you set it up, Longhorn is extremely user friendly.
Installation
You should definitely follow the official docs, but the TL;DR is:
$ helm repo add longhorn https://charts.longhorn.io
$ helm repo update
$ helm install longhorn longhorn/longhorn --namespace longhorn-system --create-namespace --version 1.8.1
Check if it started successfully by running this command:
$ kubectl -n longhorn-system get pod
NAME                                                READY   STATUS    RESTARTS   AGE
csi-attacher-5d68b48d9-8hg9z                        1/1     Running   0          27s
csi-attacher-5d68b48d9-fkjnj                        1/1     Running   0          27s
csi-attacher-5d68b48d9-kdgff                        1/1     Running   0          27s
csi-provisioner-6fcc6478db-mbb5c                    1/1     Running   0          27s
csi-provisioner-6fcc6478db-x6nhk                    1/1     Running   0          27s
csi-provisioner-6fcc6478db-z7csq                    1/1     Running   0          27s
csi-resizer-6c558c9fbc-btwcs                        1/1     Running   0          27s
csi-resizer-6c558c9fbc-fgw9g                        1/1     Running   0          27s
csi-resizer-6c558c9fbc-ggpc4                        1/1     Running   0          27s
csi-snapshotter-874b9f887-2n6lx                     1/1     Running   0          27s
csi-snapshotter-874b9f887-gb2rm                     1/1     Running   0          27s
csi-snapshotter-874b9f887-jqhl4                     1/1     Running   0          27s
engine-image-ei-db6c2b6f-8lptt                      1/1     Running   0          84s
engine-image-ei-db6c2b6f-krtkt                      1/1     Running   0          84s
engine-image-ei-db6c2b6f-vrlh7                      1/1     Running   0          84s
instance-manager-1a1bab1ec71bdfa611ed414eec69bb5c   1/1     Running   0          45s
instance-manager-768de505cd7376cc6d5ec438199607b9   1/1     Running   0          54s
instance-manager-77d0fd072369dff7dc6a6198ad62847e   1/1     Running   0          45s
longhorn-csi-plugin-jz2sq                           3/3     Running   0          27s
longhorn-csi-plugin-ldn7c                           3/3     Running   0          27s
longhorn-csi-plugin-q2xfj                           3/3     Running   0          27s
longhorn-driver-deployer-7f95558b85-qcqrb           1/1     Running   0          106s
longhorn-manager-5d2rr                              2/2     Running   0          106s
longhorn-manager-qjgpj                              2/2     Running   0          106s
longhorn-manager-s4667                              2/2     Running   0          106s
longhorn-ui-7ff79dfb4-kjjsm                         1/1     Running   0          106s
longhorn-ui-7ff79dfb4-rkkt9                         1/1     Running   0          106s
Once it’s all up and running, you can check the k8s storage classes have been created. You should see the Longhorn specific ones as below:
$ kubectl get sc
NAME                   PROVISIONER             RECLAIMPOLICY   VOLUMEBINDINGMODE      ALLOWVOLUMEEXPANSION   AGE
local-path (default)   rancher.io/local-path   Delete          WaitForFirstConsumer   false                  145m
longhorn (default)     driver.longhorn.io      Delete          Immediate              true                   2m13s
longhorn-static        driver.longhorn.io      Delete          Immediate              true                   2m11s
Set default storage class
You can see in the above output that the default storage class is still local-path, meaning the local node disk will be used. You can leave it like this and request for the longhorn storage class explicitly when defining a PersistentVolumeClaim, or you can set it as default and stop caring about it, which is what I did:
$ kubectl patch storageclass longhorn -p \
  '{"metadata": {"annotations": {"storageclass.kubernetes.io/is-default-class": "true"}}}'
$ kubectl patch storageclass local-path -p \
  '{"metadata": {"annotations": {"storageclass.kubernetes.io/is-default-class": "false"}}}'
Replication factor
The storage class called longhorn that was just created during the installation has a replication factor of 3. You can check by running:
$ kubectl get storageclass longhorn -o yaml
...
  numberOfReplicas: "3"
...
Among other output, you will see a numberOfReplicas parameter, whose value is 3.
If you, like me, are running a 3 node cluster and allocate one disk on each to the Longhorn storage pool, 3 is the maximum useful value you can go. If you have more disks you can of course go higher, but honestly how many disks are gonna fail at the same time? 3 should be enough.
However, you might want to go lower. A replication factor of 3 means that you will use 3x as much storage for your data. If you are constrained on disk space, you might want to go lower, so I will show you how to create a storage class with a replication factor of 2. Create a file called longhorn-2-replicas.yml:
apiVersion: storage.k8s.io/v1
kind: StorageClass
metadata:
  name: longhorn-2-replicas
provisioner: driver.longhorn.io
parameters:
  numberOfReplicas: "2"
  staleReplicaTimeout: "30"
  fromBackup: ""
  fsType: "ext4"
  dataLocality: "disabled"
  unmapMarkSnapChainRemoved: "ignored"
  disableRevisionCounter: "true"
  dataEngine: "v1"
reclaimPolicy: Delete
volumeBindingMode: Immediate
allowVolumeExpansion: true
And the run:
$ kubectl apply -f longhorn-2-replicas.yml
If you want, you can set it as default by following the process I presented earlier.
Accessing the UI
For now you can access the interface by creating a local port-forward:
$ kubectl port-forward -n longhorn-system svc/longhorn-frontend 8080:80
Then open http://localhost:8080 in a browser.
In future articles I’ll show how to install MetalLB and Cert-Manager. Once you do that, you can define an ingress for the Longhorn service like this:
apiVersion: networking.k8s.io/v1
kind: Ingress
metadata:
  name: longhorn-ingress
  namespace: longhorn-system
  annotations:
    cert-manager.io/cluster-issuer: letsencrypt-dns
    traefik.ingress.kubernetes.io/router.entrypoints: websecure
spec:
  rules:
  - host: longhorn.k3s.alexmihai.rocks
    http:
      paths:
      - path: /
        pathType: Prefix
        backend:
          service:
            name: longhorn-frontend
            port:
              number: 80
  tls:
  - hosts:
    - longhorn.k3s.alexmihai.rocks
    secretName: longhorn-k3s-tls
As long as you have your DNS set up so that the traffic reaches the cluster, you’ll be able to access the Longhorn UI through a URL like https://longhorn.k3s.alexmihai.rocks in this example.
Adding disks in the OS
By default, each node already has a disk created, which is a folder that Longhorn created on the OS disk. You can see this in the Node section of the UI.
This will work fine, but if you want to use dedicated disks for Longhorn here’s what you need to do. Note that you will have to do this on each of your nodes. It goes without saying that you will lose any data that already exists on these drives.
For me the extra drive is recognized as nvme0n1, so in the commands below replace it with your own. You can find out the device name by running the lsblk command.
First, we wipe any existing partitions by running:
$ sudo wipefs -a /dev/nvme0n1
$ sudo sgdisk --zap-all /dev/nvme0n1
Afterwards it should look something like this:
$ lsblk /dev/nvme0n1
NAME    MAJ:MIN RM   SIZE RO TYPE MOUNTPOINTS
nvme0n1 259:0    0 238.5G  0 disk
Next, format the disk as ext4.
$ sudo mkfs.ext4 /dev/nvme0n1
Create a mount point:
$ sudo mkdir -p /mnt/longhorn
Mount the device in /etc/fstab and mount it:
$ echo '/dev/nvme0n1 /mnt/longhorn ext4 defaults 0 0' | sudo tee -a /etc/fstab
$ sudo mount -a
Check everything went well:
$ lsblk
NAME    MAJ:MIN RM   SIZE RO TYPE MOUNTPOINTS
...
nvme0n1 259:0    0 238.5G  0 disk /mnt/longhorn
Adding disks in Longhorn
Open the Longhorn UI and go to the Node section. On the right of each node, on the Operation column, go to Edit node and disks. Click Add disk at the bottom of that form. Fill the information as follows:
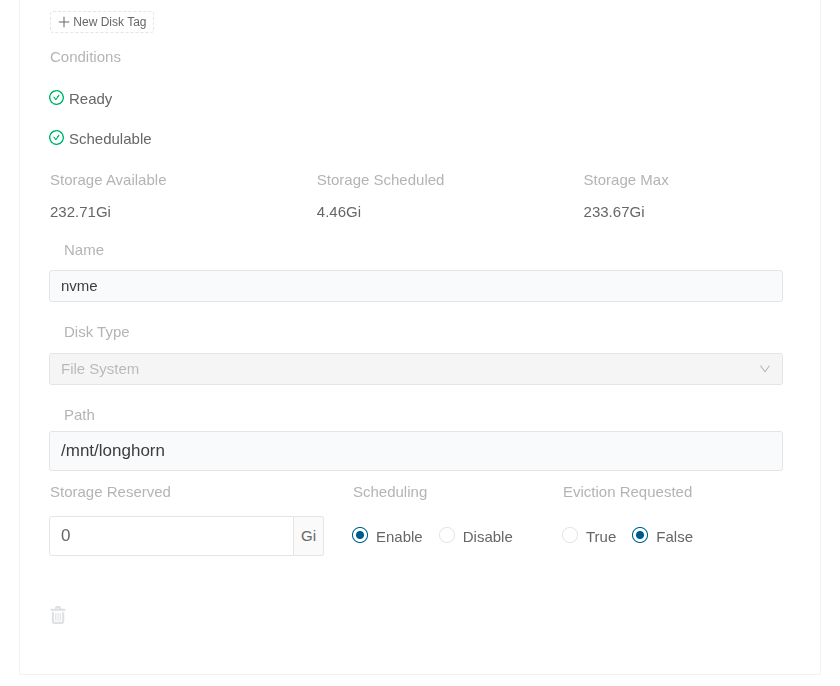
If you. like me, don’t want the OS drive used (the used folder is /var/lib/longhorn/), you can remove it by clicking Disable on Scheduling and then the Delete icon at the bottom.
Do this on all your nodes.
Solving reported issues
This is completely optional, none of these issues actually affect your cluster running just fine. But I don’t like seeing red, so I solved a couple of them.
In the Edit node and disks form there is also a Conditions section where some issues are reported: KernelModulesLoaded, Multipathd and RequiredPackages.
KernelModulesLoaded
Message: ‘Kernel modules [dm_crypt] are not loaded’.
The reason for it is that Longhorn optionally supports volume encryption and it needs this module in the OS. If you don’t plan to use encryption you can ignore it, but if you want to fix it you can run:
$ sudo modprobe dm_crypt
$ echo dm_crypt | sudo tee -a /etc/modules
Multipathd
Message: multipathd is running with a known issue that affects Longhorn. See description and solution at…
You’re probably not using multipathd, so the solution for this one is to disable it:
$ sudo systemctl disable multipathd --now
$ sudo systemctl disable multipathd.socket --now
RequiredPackages
Message: Missing packages: [nfs-common].
To fix this one, run:
$ sudo apt install -y nfs-common
Conclusion
You are now ready to schedule workloads with Persistent Volume Claims in your k3s cluster and your data will be replicated across all 3 nodes. In case a drive goes bad, you’re completely fine. You’re also fine if you want to take a node down for maintenance.
Hope this helps, have fun clickity-clacking.
Leave a Reply