You might find yourself in the situation where you want to build and deploy your own docker images. You can of course use a paid service like DockerHub, GitHub Container Registry, etc. There are also free options like the one offered by DockerHub if you don’t mind them being public, but if you want something private and free, keep reading.
In such a situation you might opt to run your own registry. Bear in mind this is in no way some production-ready solution, but for personal use on a small enough scope that does not require resilience it works well.
The main idea is taken from https://www.docker.com/blog/how-to-use-your-own-registry-2/, just adapted for Docker Compose, since I run everything with it. But I will also cover how to turn it into a proper domain with SSL, so that your docker clients don’t have to be configured to ignore SSL.
Initial setup
Here’s the docker-compose.yml file that we are going to use:
services:
  registry:
    image: registry:2.8.3
    container_name: registry
    ports:
      - 5000:5000
    restart: unless-stopped
    networks:
      - registry-network

networks:
  registry-network:
    name: registry-network
If you use Portainer, create a new stack and paste the file contents in the web editor. If you don’t yet, you should give it a try, check out this tutorial of how to set it up: https://alexmihai.rocks/2024/10/07/install-portainer-to-handle-your-docker-administration/ .
If you don’t want to use Portainer that’s ok, just put the docker-compose.yml file somewhere on the machine where you want to deploy it and run:
$ docker compose up -d
At this point the registry should be working, let’s give it a try. I’ll push an Ubuntu image to the repository:
$ docker pull ubuntu
Using default tag: latest
latest: Pulling from library/ubuntu
e3366dd68755: Pull complete
Digest: sha256:278628f08d4979fb9af9ead44277dbc9c92c2465922310916ad0c46ec9999295
Status: Downloaded newer image for ubuntu:latest
docker.io/library/ubuntu:latest
$ docker tag ubuntu localhost:5000/ubuntu
$ docker push localhost:5000/ubuntu
Using default tag: latest
The push refers to repository [localhost:5000/ubuntu]
2d6b6e63aa2f: Pushed
latest: digest: sha256:8c0cd79cc31c13c52d7c149b67705cf908c7640578f769e34dcbf3d822180442 size: 529
Ok, that’s cool if you plan to use it only on that machine, but now let’s try to use the repository from a different host in the network.
$ docker pull 192.168.68.108:5000/ubuntu
Using default tag: latest
Error response from daemon: Get "https://192.168.68.108:5000/v2/": http: server gave HTTP response to HTTPS client
Oops, that didn’t work. The docker client expects an https endpoint. That’s not actually needed if we access it only in our local network, but instead of configuring all our docker clients to work with HTTP endpoints, why don’t we actually make the endpoint HTTPS?
HTTPS endpoint
Now this part assumes you have some domain so that you can use a subdomain for the Docker Registry. Even if you don’t want to pay for a domain, you can use something like duckdns.org to get a free subdomain.
How this is going to work is that we will have a subdomain, like docker.alexmihai.rocks, that will resolve to our Nginx Proxy Manager private IP address so that it’s only accessible from within our network. And in Nginx Proxy Manager we will configure an SSL certificate for the subdomain and have it resolve to the actual IP and port of the Docker Registry service.
If you’ve never used Nginx Proxy Manager, here’s how to set it up: https://alexmihai.rocks/2024/11/05/install-nginx-proxy-manager-using-docker-compose/ .
If you want to get familiar working with Nginx Proxy Manager, here’s a tutorial describing how to host a public domain using it: https://alexmihai.rocks/2024/11/11/self-host-using-nginx-proxy-manager-lets-encrypt-and-cloudflare/ . This tutorial describes in detail how to set up the SSL certificate for the top level domain and the subdomains, which is an important part of what we’re doing now.
First set up an A type DNS record for the subdomain you want to use. I use Cloudflare, so here’s how that looks:
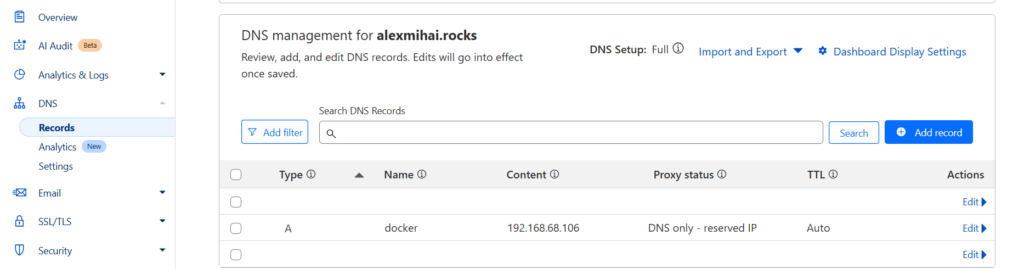
Again, note the IP value should be the private IP of the machine running the Nginx Proxy Manager. How you get that depends on the OS, but what I like to do is install btop and the net section should show your IP (you can even navigate the network interfaces should you need to, with the b and n keys).
Now we need to configure Nginx Proxy Manager. To learn how to set up the SSL certificate, please check out this tutorial: https://alexmihai.rocks/2024/11/11/self-host-using-nginx-proxy-manager-lets-encrypt-and-cloudflare/ .
In the Hosts section of Nginx Proxy Manager, add a new host. In the Details tab, fill in the subdomain for Domain Names, http for Scheme, the private IP of the machine running Docker Registry for Forward Hostname / IP and 5000 for Forward Port. You can leave the checkboxes as default or you can configure them like in the image below, for this service it’s not at all important since it’s only accessible in our private LAN.

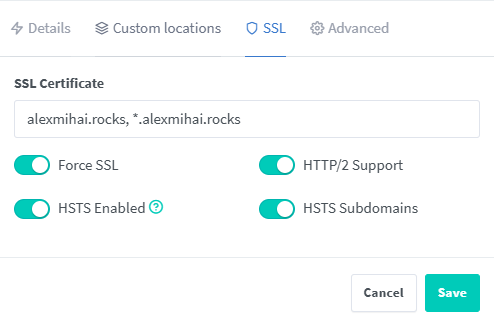
In the SSL tab pick the correct certificate and check all the checkboxes.
Now click Save and you’re done. Let’s perform the same test we tried earlier from a different host, but this time using the subdomain:
$ docker pull docker.alexmihai.rocks/ubuntu
Using default tag: latest
latest: Pulling from ubuntu
ea4ac7c2aed5: Pulling fs layer
ea4ac7c2aed5: Verifying Checksum
ea4ac7c2aed5: Download complete
ea4ac7c2aed5: Pull complete
Digest: sha256:dfa779f7863ba3625644578d0af2de16568c5493c318c8bd596c25a064f11c37
Status: Downloaded newer image for docker.alexmihai.rocks/ubuntu:latest
docker.alexmihai.rocks/ubuntu:latest
It is now working as expected.
As a next step, it would be good to reserve the IP address of the machine running Docker Registry, otherwise when/if the IP changes, you will have to update the Nginx Proxy Manager config. You should be able to do that in you router’s settings.
Hope this helps, have fun clickity-clacking.
Leave a Reply