I have previously posted about running a Cloudflare DDNS to keep your Cloudflare DNS records up to date with your public IP. You can find that article here: https://alexmihai.rocks/2024/11/11/cloudflare-ddns-to-self-host-under-a-dynamic-ip/.
However, I decided to build my own. If you want to check out the GitHub repo, here it is: https://github.com/alexmihai1984/cloudflare-ddns.
Why?
The existing solution, which can be found at https://github.com/timothymiller/cloudflare-ddns, did not work perfectly for me.
First, sometimes on my setup, when powered up, that solution would simply not work; I’m not exactly sure why and that gets me to the second point.
It lacked logs of what went wrong in the above scenario. Also, it lacked timestamps on the logs, making it hard to understand when something happened or if the application is currently running correctly.
I just wanted to change the IP, I want every other piece of configuration to remain as it is, no need to change ttl for example; and by looking at the code it seemed to me that ttl was both used for the DNS TTL and for the running frequency of the task.
Initially I wanted to contribute to the existing solution, but I wanted something fast and I would have needed to get familiar with Python, and that would have been much more time-consuming.
And since I built it I thought I’d make it publicly, freely available.
How to use it
This is going to be very similar to my previous article, but for completeness I will duplicate everything that is needed here.
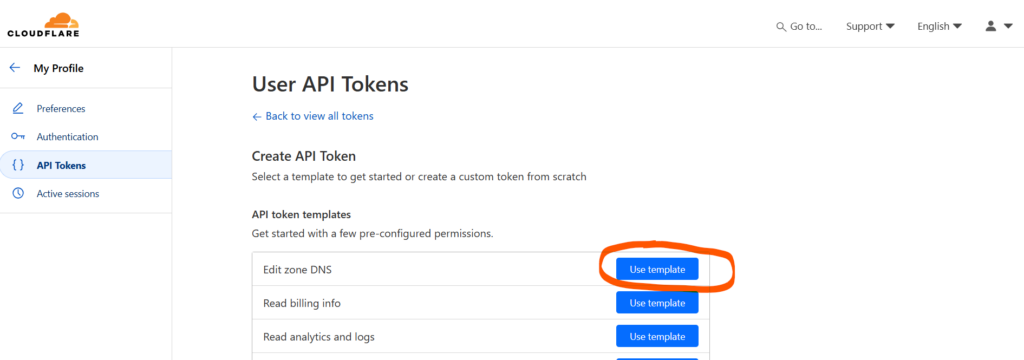
Get Cloudflare API token
In your Cloudflare account, go to My Profile -> API Tokens -> Create Token. Generate a Cloudflare API token with Edit Zone DNS permission.
On the next page you can either choose Specific zone and select the domain you want to do this for, or All zones, which allows you to use the same token for all your domains. And yes, Cloudflare calls your domains zones for some reason.
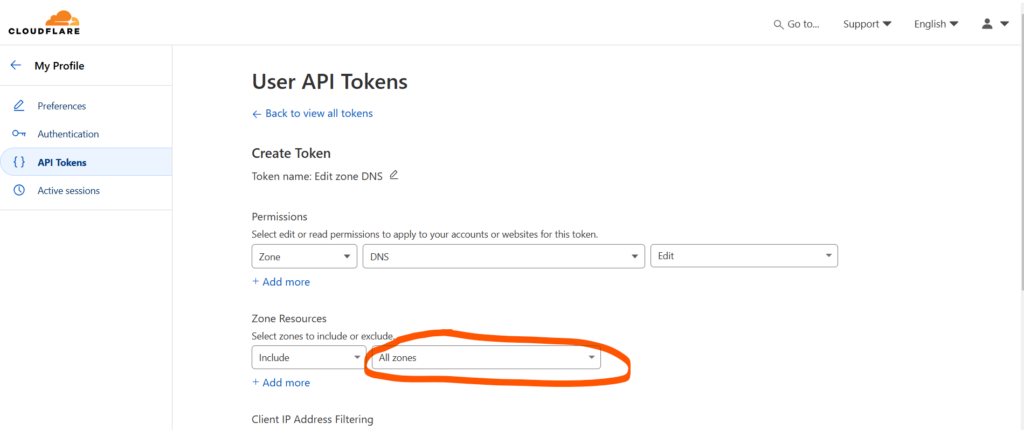
Then click Continue to summary at the bottom and on the next page click Create token.
Save the generated token somewhere, you will not be able to retrieve it later on. If you lose it, you’ll have to create another one.
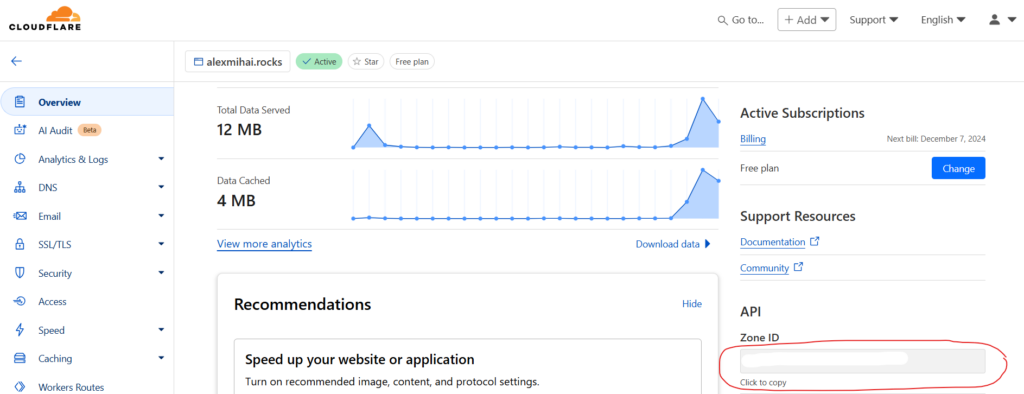
From your domain’s Overview page, retrieve the Zone ID, we’re going to need it.
Run with Docker Compose
First, create a folder for your stack, I created mine at ~/docker/cloudflare-ddns. Inside it we will create 2 files, docker-compose.yml and application.yml.
Here are the contents of the docker-compose.yml file:
services:
  cloudflare-ddns:
    image: alexmihai1984/cloudflare-ddns:1.0.1
    container_name: cloudflare-ddns
    restart: unless-stopped
    volumes:
      - /home/alex/docker/cloudflare-ddns/application.yml:/application.yml

networks:
  cloudflare-ddns-network:
    name: cloudflare-ddns-network
Here’s a application.ymlapi.yourdomain-2.com:
cloudflare:
  zones:
    - id: <your cloudflare zone 1 id>
      token: <your cloudflare api token for zone 1>
      domains:
        - yourdomain-1.com
    - id: <your cloudflare zone 2 id>
      token: <your cloudflare api token for zone 2>
      domains:
        - yourdomain-2.com
        - api.yourdomain-2.com
Let me explain the different configurations a little:
cloudflare.zones– An array of objects, each object representing your configuration for a domain (or zone in Cloudflare terminology).cloudflare.zones.idcloudflare.zones.tokencloudflare.zones.domains
You can find multiple configuration examples (like using a single API token) in the GitHub repo’s readme: https://github.com/alexmihai1984/cloudflare-ddns.
From the folder where you have your docker-compose.yml file, run:
$ docker compose up -d
Check the container logs to see if it’s working properly. To actually test it, you can update your DNS record to some invalid IP and see that cloudflare-ddns updates it.
What’s next?
When I find some time I would like to make it use GraalVM to reduce the memory footprint.
Hope this helps, have fun clickity-clacking.
Leave a Reply