Why?
Lately I’ve felt the need to use a proper note taking app. I’m getting old and I can’t keep track of everything that is going on: job, homelab, learning new stuff, to-do lists.
Choosing a note-taking app
In terms of features, I wanted something as close to writing markdown in GitHub as possible. Code blocks are important to me. Ideally it would have an integration to some diagram drawing too like Excalidraw or Drawio. Maybe even with Mermaid for diagrams as code.
The first thought that popped into my mind was to look at a paid service like Evernote. Then I started looking at Evernote alternatives like Notion and Obsidian.
The interesting thing about Obsidian in particular is that all the data is stored locally on the device where it is used, as .md files. And that part is free. You have to pay if you want your files synchronized across multiple devices. Obsidian seems very popular with tech youtubers, and I love the fact that the notes are stored as .md files, but for me the synchronization thing was a no-go. Updating files from multiple devices, some of which might lose connectivity, and having to decide what is the correct state, might go bad occasionally.
At this point, given my tendency to self-host stuff, I tried finding a solution I can self-host, so I defined my criteria more clearly:
- self-hosted
- open-source
- single source of truth, no synchronization
- web UI (so I can access it from anywhere through a browser)
- ideally notes are stored as markdown
From the self-hosted alternatives, Trilium popped up as being very popular, especially on Reddit, and indeed it seemed very feature rich. There were 2 main issues I identified with it at first glance:
- it was in maintenance mode, not being actively developed
- the notes are stored in a database, not as
.mdfiles
I kept looking and I did find one that checked all the boxes: open source, self-hosted, web UI, notes stored as .md files. That is Silver Bullet. I did install it and it seems like a very good product, I think in the future it might become the go to solution. But at this point I find it a bit lacking. First, besides the basic functionality, everything is a plugin. If you want to view notes in a tree view, that’s a plugin (not installed by default). So you have to figure that out and you will, but at the time of this writing, there aren’t that many plugins. On the official website there are 7 that come installed by default and 11 third-party. And none of them integrate with a drawing tool. Also, if you mess anything up during plugin install (which I did), you get no feedback, no error. It’s just that the functionality doesn’t work, you need to figure out why. So I think Silver Bullet has a bright future if the devs keep at it, but it’s not there yet.
So I went back to Trilium. I found there are signs of life with TriliumNext, a fork that seems to take the original Trilium further. However, there is still the issue that it has it’s own DB, so migrating out of it will be a pain. It does have a feature to export notes as markdown, but people complain that it messes up the note structure.
So for now I decided to go with TriliumNext, hopefully I won’t want to move out of it. If I will, that’s a problem for future me.

Authentik
Next step in the planning was thinking about exposing the app to the internet so that I can access it from anywhere. The problem is Trilium does not offer 2FA out of the box, so enter Authentik. Since the Authentik setup is pretty long, I wrote a separate article about it. Do that setup first and come back to this article.
Update: I see TriliumNext has introduced MFA, so you can go that route, it’s much easier. But there is still utility in using Authentik (or something similar) for SSO (Single Sign-On). It is very helpful if you plan to publicly expose multiple applications, as it allows logging in just once, with a single set of credentials.
Trilium setup
Here is the docker-compose.yml file that we will use to run Trilium:
services:
  trilium:
    image: triliumnext/notes:v0.92.7
    container_name: trilium
    restart: unless-stopped
    ports:
      - 3080:8080
    volumes:
      - trilium-storage:/home/node/trilium-data
      - /etc/timezone:/etc/timezone:ro
      - /etc/localtime:/etc/localtime:ro
      - /home/alex/docker/trilium/config.ini:/home/node/trilium-data/config.ini:ro
    networks:
      - trilium-network

volumes:
  trilium-storage: {}

networks:
  trilium-network:
    name: trilium-network
As you can see, I use TriliumNext, which I mentioned earlier. The Docker Compose file is taken from the TriliumNext repo, with a slight twist. Since I want to use Authentik for authentication, I had to disable Trilium’s own authentication mechanism. For that, I mapped a read-only config.ini file. Unfortunately, disabling the authentication cannot be achieved with an environment variable, according to the documentation config.ini is the only way to do it. So I took the original one from the container and modified it with noAuthentication=true and mounted it from the Docker host to the container. Here’s the full config.ini file:
[General]
# Instance name can be used to distinguish between different instances using backend api.getInstanceName()
instanceName=

# set to true to allow using Trilium without authentication (makes sense for server build only, desktop build doesn't need password)
noAuthentication=true

# set to true to disable backups (e.g. because of limited space on server)
noBackup=false

# Disable automatically generating desktop icon
# noDesktopIcon=true

[Network]
# host setting is relevant only for web deployments - set the host on which the server will listen
# host=0.0.0.0
# port setting is relevant only for web deployments, desktop builds run on a fixed port (changeable with TRILIUM_PORT environment variable)
port=8080
# true for TLS/SSL/HTTPS (secure), false for HTTP (insecure).
https=false
# path to certificate (run "bash bin/generate-cert.sh" to generate self-signed certificate). Relevant only if https=true
certPath=
keyPath=
# setting to give trust to reverse proxies, a comma-separated list of trusted rev. proxy IPs can be specified (CIDR notation is permitted),
# alternatively 'true' will make use of the leftmost IP in X-Forwarded-For, ultimately an integer can be used to tell about the number of hops between
# Trilium (which is hop 0) and the first trusted rev. proxy.
# once set, expressjs will use the X-Forwarded-For header set by the rev. proxy to determinate the real IPs of clients.
# expressjs shortcuts are supported: loopback(127.0.0.1/8, ::1/128), linklocal(169.254.0.0/16, fe80::/10), uniquelocal(10.0.0.0/8, 172.16.0.0/12, 192.168.0.0/16, fc00::/7)
trustedReverseProxy=false

[Sync]
#syncServerHost=
#syncServerTimeout=
#syncServerProxy=
I also changed the trilium-data directory from a folder mount to a Docker volume. And gave it its own network, as I do with all my stacks. Oh, and I changed the port mapping to something that was available on my host.
Now you can start it up either using Portainer or using docker compose up -d.
On the first access you will get a screen like the one below:

Choose the “I’m a new user…” option.
Because we disabled the Trilium authentication to make it work with Authentik, you should not get the Trilium authentication.
DNS and reverse proxy setup
Now let’s make it publicly available. For this you will have to do 2 things:
- create a subdomain like trilium.example.com that points to your public IP (checkout my Cloudflare DDNS if you don’t have a static IP)
- create a record in your reverse proxy (I use Nginx Proxy Manager) that points to the service
If you’re interested in the type of setup I use, you can read this article. If you have something similar, first create the DNS record:
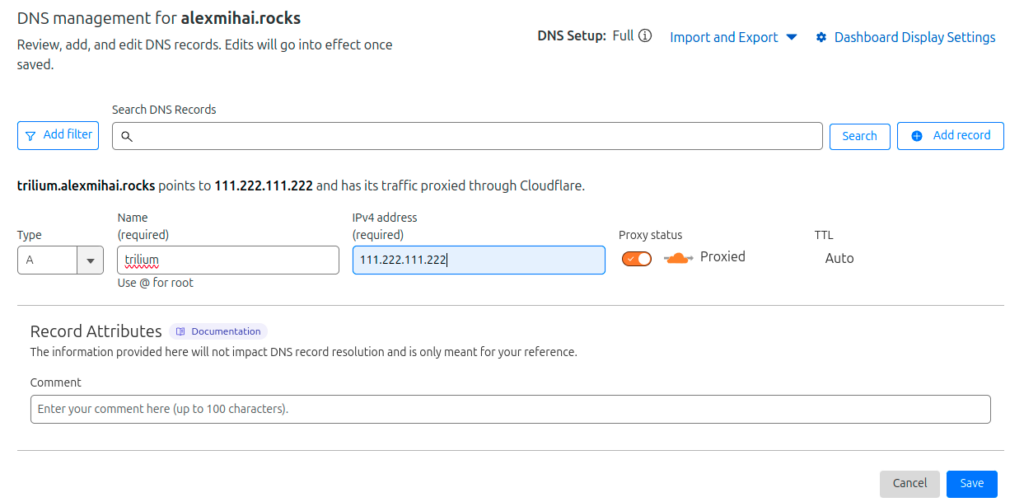
Then create the Nginx Proxy Host:
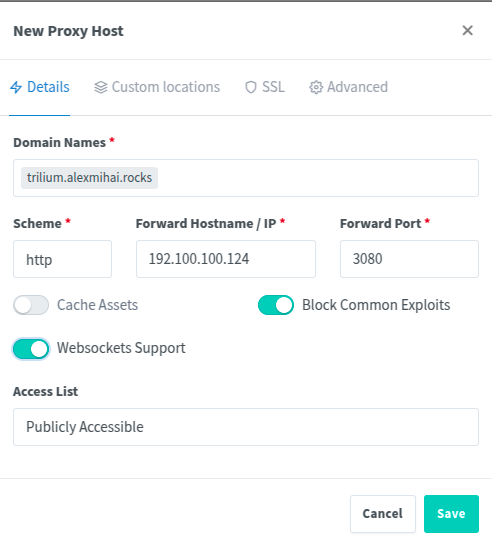
At this point you should be able to access it via the DNS you set up, https://trilium.example.com. The Nginx Proxy Host will suffer more changes when we set up the authentication.
Authentik configuration
Now we need to configure Authentik and Nginx Proxy Manager to do authentication for https://trilium.example.com.
First, log into Authentik with the credentials you’ve set up and go to the Admin dashboard (button on the top right).
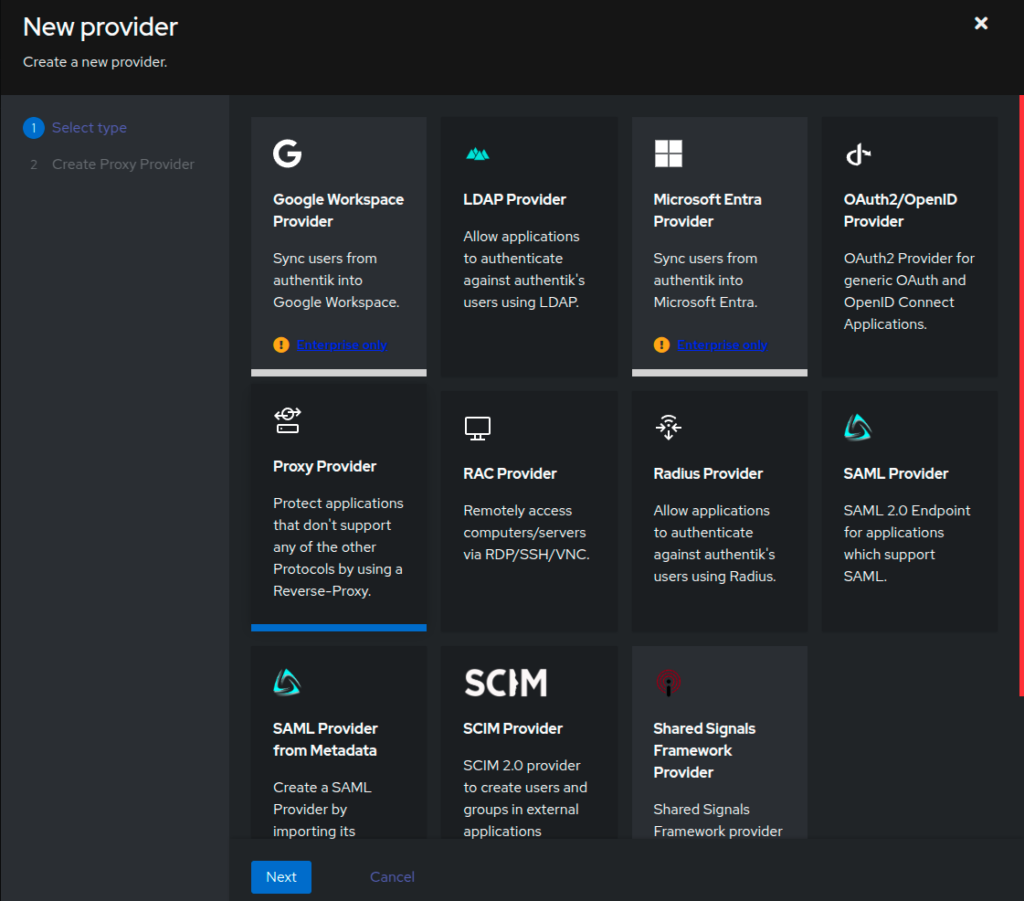
Go to Applications > Providers and click Create. Choose Proxy Provider and click Next.
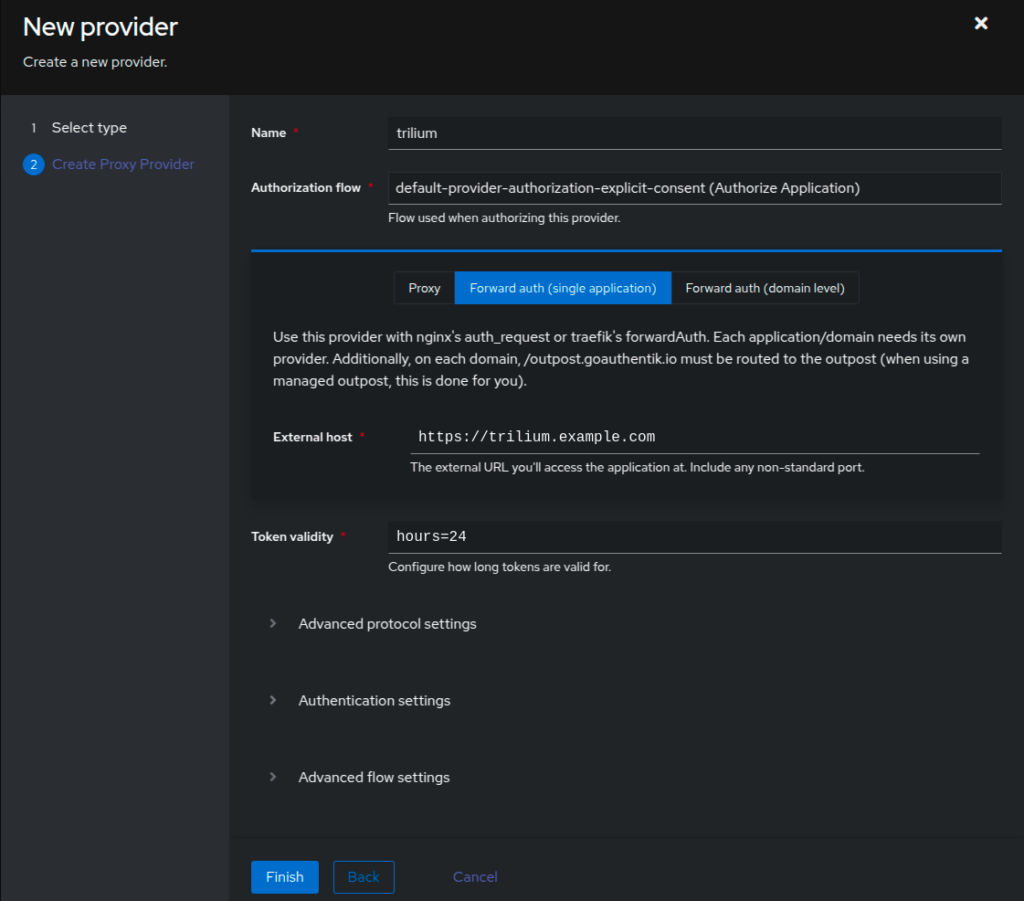
Give it a name that will help you identify it, like trilium. For Authorization flow choose the one that contains explicit. From the 3 tabs pick Forward auth (single application). For External host enter the subdomain of the application you are securing (not Authentik’s), like https://trilium.example.com. For Token validity you can put whatever works for you, I left the default. This is the time after which you’ll be asked to login again. Click Finish to create the provider.
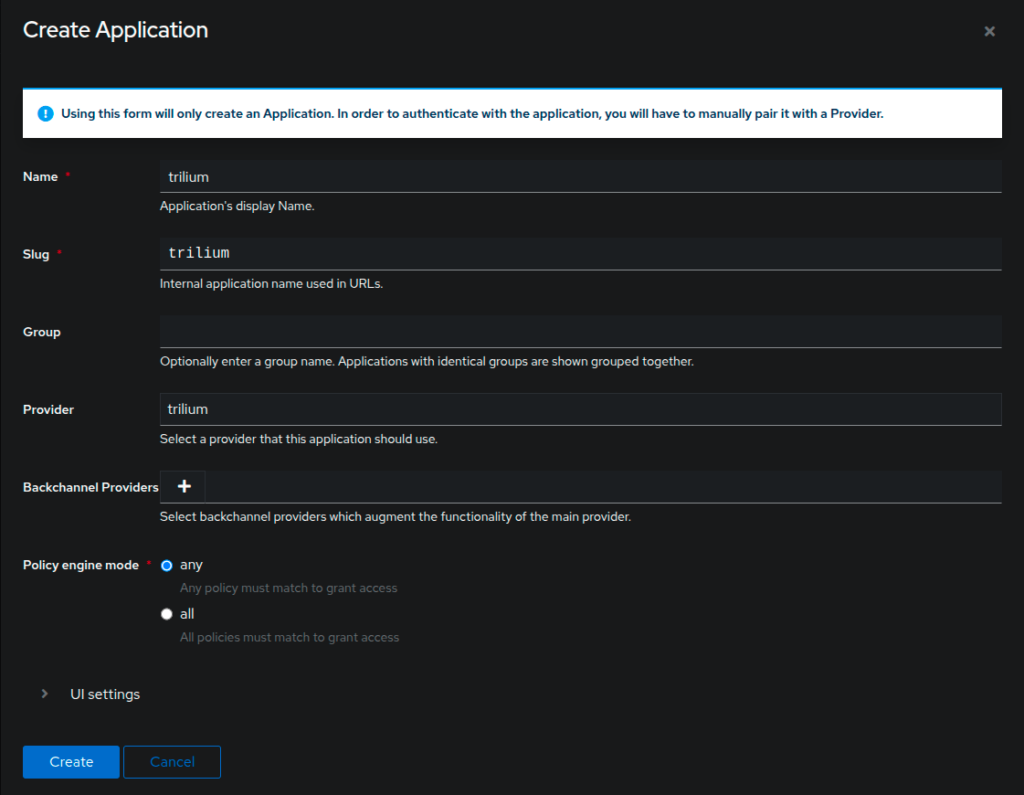
Now let’s create the application. Go to Applications > Applications and click Create (not Create with Provider, we already created the provider). Give it a relevant Name and Slug and for Provider pick the one you previously created. Leave everything else as it is and click Create.
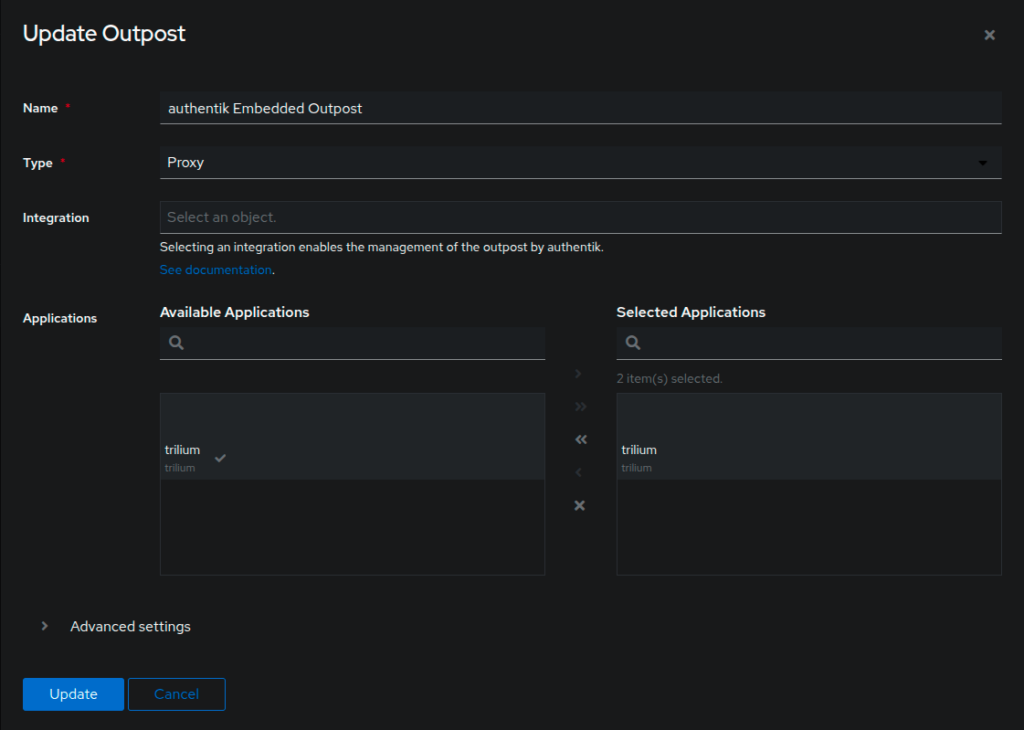
Go to Applications > Outposts and click the edit button for the only existing outpost, authentik Embedded Outpost. In the Available Applications list, select the one you just created, trilium, and move it to the right. Click Update.
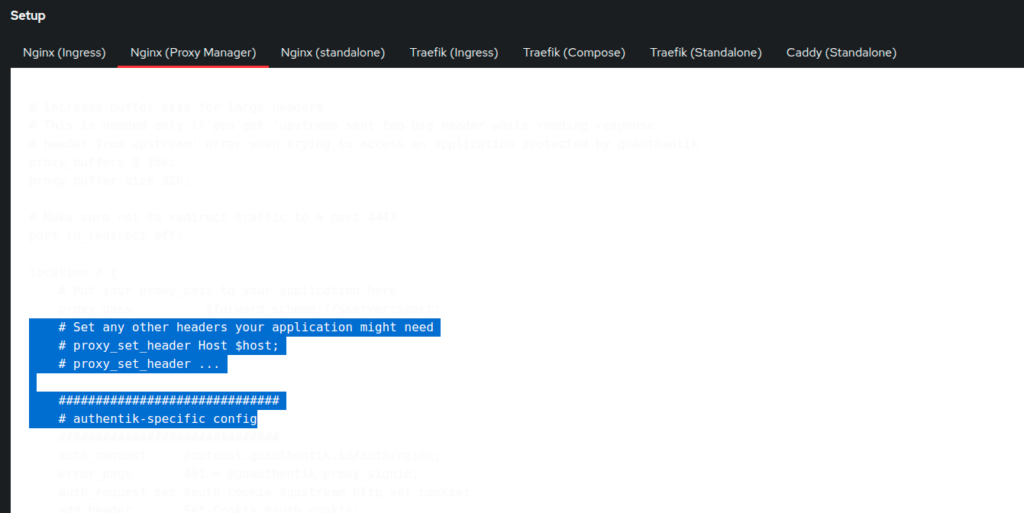
Go to Applications > Providers and click the trilium one. In the Setup section click the Nginx (Proxy Manager) one and copy the configuration text. For me, there was a bug that manifested here, the text was white on white, so it seemed like it’s not there. Not sure if it has to do with the OS theme or it’s a general thing, but the text is there, select it and you will see it.
In Nginx Proxy Manager, open the host you created for trilium, go to the advanced tab and paste the configuration you copied from Authentik. However, we are going to make a couple of changes to it.
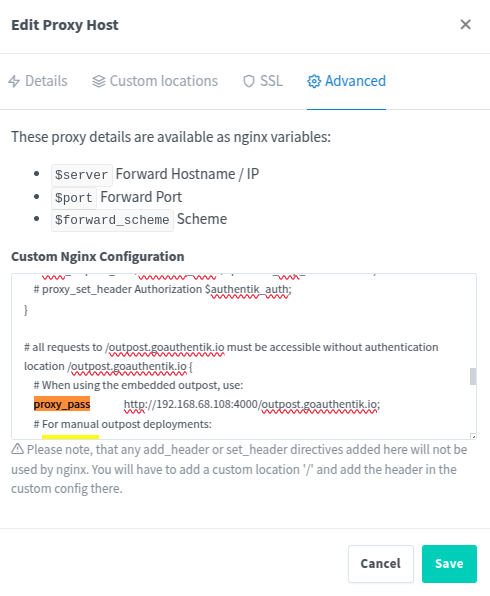
Find proxy_pass param under the location /outpost.goauthentik.io section and replace http://authentik.company:9000/outpost.goauthentik.io; with http://<authentik-local-ip>:4000/outpost.goauthentik.io;. Here is mine:
Save and let’s test. Open your Trilium subdomain in an Incognito browser window and you should be redirected to Authentik’s authentication page. After you enter your credentials, you will be directed to your Trilium instance.
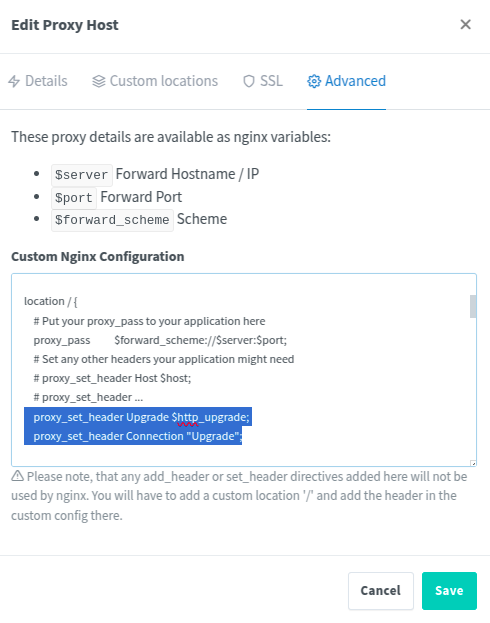
However, if you create a new note, you’ll notice it’s not visible without page refresh and in the browser console you can see some errors like WebSocket connection to 'wss://trilium.example.com/' failed. It means the websocket connection isn’t working. So let’s fix that by setting the appropriate headers. In the location / section, set these 2 headers:
proxy_set_header Upgrade $http_upgrade;
proxy_set_header Connection "Upgrade";
Here’s a screenshot of mine, so you can get a sense of it:
An issue I couldn’t solve
According to the documentation, the app should detect when it’s accessed with a mobile device and use a mobile-friendly layout. However, for me this does not work. I couldn’t try the suggestion to force it because I’m not using the Trilium login page. I just ticked the Desktop site in Chrome on my phone and it’s usable.
Update: I reported the issue to the TriliumNext team and they immediately fixed it. So as of v0.92.7, you will have a nice mobile-friendly web UI. I’m also happy to see that the devs are quite active in this fork.
Hope this helps, have fun clickity-clacking.
Leave a Reply