About Audiobookshelf
Audiobookshelf is an open-source, self-hosted server for managing and streaming audiobooks and podcasts. Designed for simplicity and performance, it lets users organize their personal audiobook libraries and access them from any device through a clean web interface or mobile app. Audiobookshelf supports features like bookmarking, playback speed control, metadata editing, and multi-user access.
About Authentik
Authentik is an open-source identity provider focused on flexible, secure authentication and authorization. It acts as a centralized access management system, offering features like single sign-on (SSO), LDAP/Active Directory integration, OAuth2, SAML, and user self-service portals. Designed for self-hosting, it offers complete control over user access, security policies, and application integration, all through a modern, intuitive interface.
Use case
Audiobookshelf has it’s own authentication/authorization mechanism with user/password, but you might want:
- 2FA (2-Factor Authentication) for extra security.
- SSO (Single Sign-On) in order to login only once and be able to access multiple applications. For example, in a previous article I mentioned that you can secure a note-taking application like Trilium with Authentik. You can use the same Authentik login to also access Audiobookshelf, so that you don’t need multiple credentials.
Prerequisites
This article will not cover installing neither Audiobookshelf nor Authentik.
You need to have a working instance of Audiobookshelf. There are multiple options for installation, i suggest looking at the Docker Compose option in the official docs. You can check out my personal docker-compose.yml in Github.
You also need a working instance of Authentik. You can check out this article that walks you through it.
Whether you want to expose the services publicly or just keep it in your local network, I would recommend using some subdomains for addressing them. You can read more about how to achieve that in this article.
Authentik configuration
First, log into Authentik with the credentials you’ve set up and go to the Admin dashboard (button on the top right).
Go to Applications > Providers and click Create. Choose OAuth2/OpenID Provider and click Next.
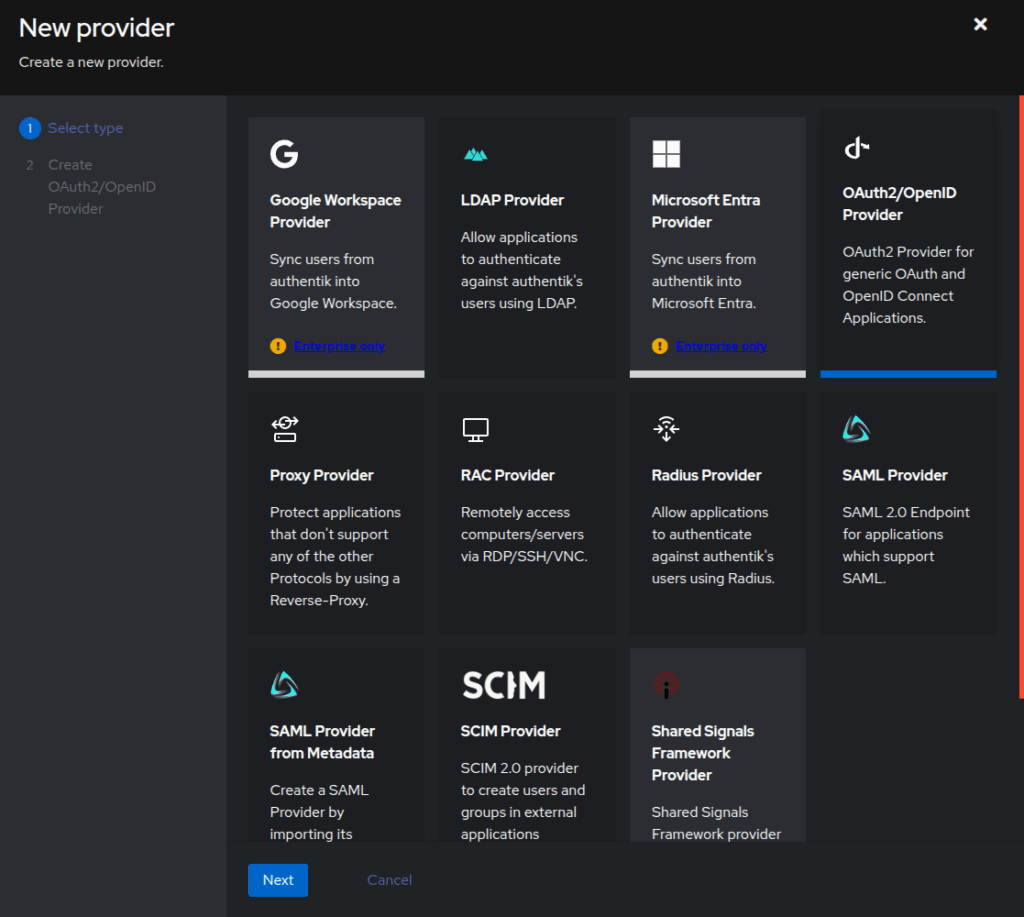
On the next screen give it a relevant name, like audiobookshelf. For Authorization flow choose default-provider-authorization-implicit-consent. For Client type leave Confidential, it should be the default. The values for Client ID and Client Secret will be needed later in Audiobookshelf, but you can revisit them. In the Redirect URIs/Origins section, add a Regex URL that matches anything starting with your Audiobookshelf instance URL, like https://audiobookshelf\.example\.com/.*. For Singning Key pick authentik Self-signed Certificate. Make sure you leave Encryption Key empty.

Expand the Advanced flow settings and pick default-authentication-flow for Authentication flow and default-provider-invalidation-flow for Invalidation flow.
You can leave everything else as is, but you can also adjust token validity duration from the Advanced protocol settings section.
Click Finish.
Now we must create the application. Go to Applications > Applications and click Create (not Create with Provider, we already created the provider). Give it a relevant Name and Slug and for Provider pick the one you previously created.
Expand the UI settings section and for Launch URL enter the URL of your Audiobookshelf instance.
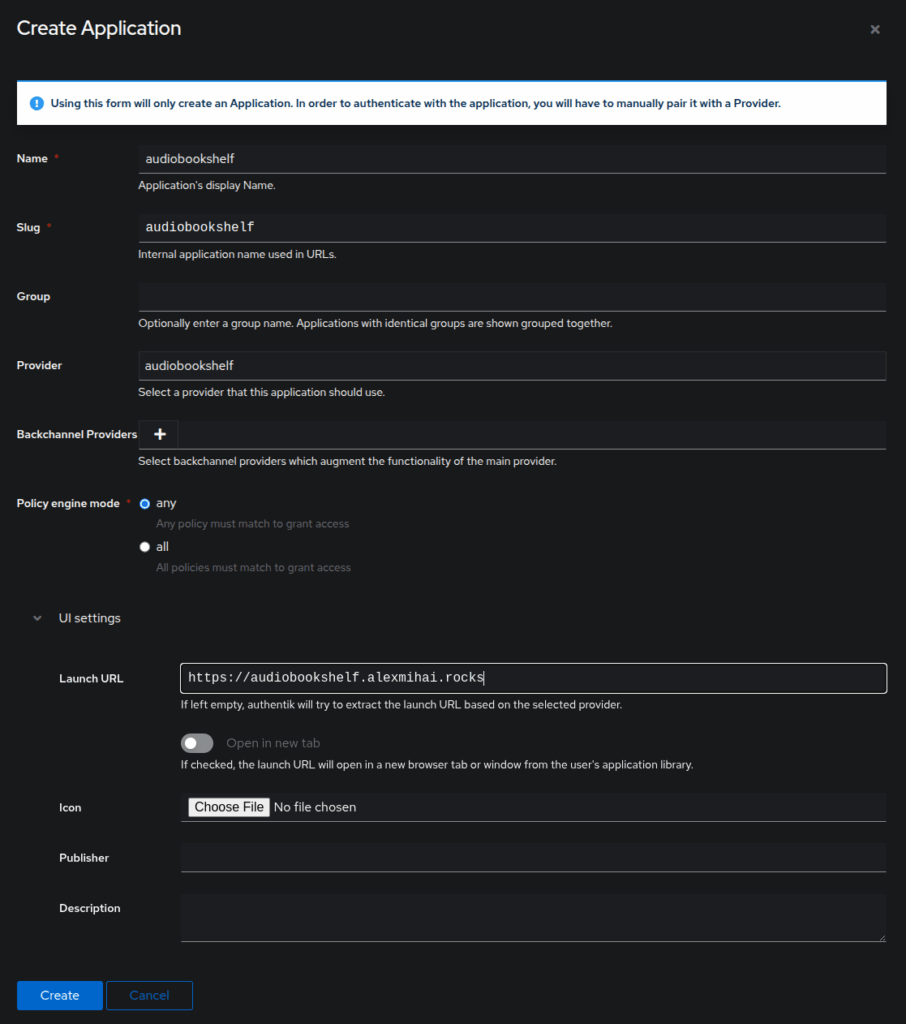
Leave everything else as it is and click Create.
Audiobookshelf config
Log into your Audiobookshelf instance and go to Settings (cog button in the top righ corner). Select Authentication from the left menu and check the OpenID Connect Authentication option.
For Client ID and Client Secret use the ones from the Authentik provider. You can go to Applications > Providers in Authentik to revisit them.
For all the URLs in the list, you can get the info by clicking the provider name in Authentik.

You can fill in each URL, but if you take the value from OpenID Configuration Issuer in Authentik and paste it in Issuer URL in Audiobookshelf, you can then click the Auto-populate button and all the URLs will get filled in.

I also checked the Auto Launch (not having to click a button to go to the Authentik login) and Auto Register (automatically create a new user on the first login) options.
You can now test the login process by navigating to your Audiobookshelf in an incognito window.
The next step for me was to disable password authentication in Audiobookshelf, but if you want to do that you should first make the new user an admin. So log in with the root user, go to Settings > Users, edit the newly created user and make it Admin.
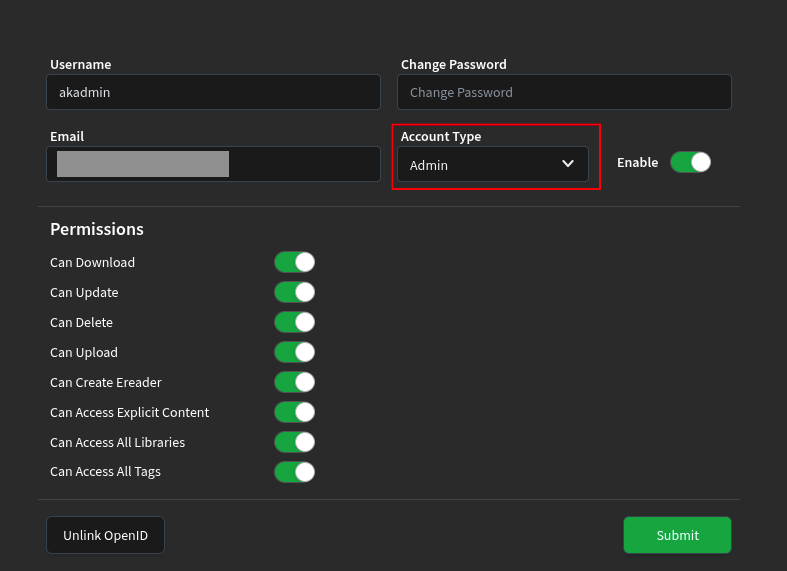
Now you can go to Settings > Authentication and disable Password Authentication. Note that once you do this you will no longer be able to login using the Audiobookshelf root user.
Hope this helps, have fun clickity-clacking.
Leave a Reply