This article assumes you already have a k8s cluster up and running. I previously wrote a guide for setting up your own k3s cluster. That series of articles is:
- Create a highly available k3s cluster in your homelab
- Resilient storage for your k3s cluster with Longhorn
- Use MetalLB to address your k3s cluster
- Manage TLS termination in your Kubernetes cluster with Cert-Manager and Let’s Encrypt
- ArgoCD for continuous deployment in your k8s cluster
It’s time to discuss putting the first useful service in k8s. Let’s start with something that doesn’t require any storage (no PVC) and is not exposed to the outside world (no ingress). Some simple service, but something that is useful, not a ‘hello world’ type of thing.
I’ll use my ow creation for this, the Cloudflare DDNS I built. This is something I was previously running in docker and the docker file looked something like this:
services:
  cloudflare-ddns:
    image: alexmihai1984/cloudflare-ddns:2026.5.4
    container_name: cloudflare-ddns
    restart: unless-stopped
    networks:
      - cloudflare-ddns-network
    volumes:
      - /home/alex/docker/cloudflare-ddns/application.yml:/application.yml

networks:
  cloudflare-ddns-network:
    name: cloudflare-ddns-network
That looks simple enough. The only thing it really needs is the volume mapping for the configuration file. That’s not the only way you can configure the project, you can also use environment variables. If you choose to run it, you can read more about that in the project’s readme.
Environment variables are easier to set up but harder to read. So for the purpose of this exercise I will keep the file mount.
GitHub repo
We will use ArgoCD for this, backed by a GitHub repo. The repo will hold the k8s resource definitions, except for any secrets (keep reading). You can create a repo specifically for this project’s deployment or a single repo for all the deployments in your homelab (this is what I do). It’s easier if you make it a public repo, so make sure you don’t keep any sensitive information in there.
So create the repo in GitHub (or your provider of choice) and check it out locally.
Secret
First, we are going to create the configuration application.yml file. You can read more about it in the project’s readme. It will live as a k8s secret, since it contains sensitive information. Because of that, we will not be checking it into Git, it will be up to you to manage it separately.
Create a cloudflare-ddns folder somewhere and a secret.yml file inside with the following content:
kind: Secret
metadata:
  name: cloudflare-ddns-secret
  namespace: cloudflare-ddns
type: Opaque
stringData:
  # Paste the exact contents of your application.yml file below
  application.yml: |
    healthcheck:
      enabled: true
      url: https://yourdomain.com
      connect-timeout: 10s
      request-timeout: 10s

    cloudflare:
      api:
        token: <your cloudflare api token>
      zones:
        - id: <your cloudflare zone 1 id>
          domains:
            - yourdomain-1.com
        - id: <your cloudflare zone 2 id>
          domains:
            - yourdomain-2.com
        - id: <your cloudflare zone 3 id>
          domains:
            - yourdomain-3.com
You can read more about the configuration here. If you previously configured it for Docker you can just copy-paste the contents in the application.yml section, just be careful with the extra indentation.
To give you an overview of the most important parts, you’re giving it a name of cloudflare-ddns-secret, saying it should be created in the cloudflare-ddns namespace and type: Opaque is basically saying it contains unstructured data from the k8s point of view.
Now we first create the namespace:
$ kubectl create ns cloudflare-ddns
namespace/cloudflare-ddns created
Then the secret:
$ kubectl apply -f secret.yml
secret/cloudflare-ddns-secret created
The secret is now in the k3s cluster.
Deployment
We’ll now create the k8s deployment. As part of the GitHub repo you created and checked out earlier, create a cloudflare-ddns folder and inside it a deployment.yml file. The contents of the file should be:
apiVersion: apps/v1
kind: Deployment
metadata:
  name: cloudflare-ddns
  namespace: cloudflare-ddns
  labels:
    app: cloudflare-ddns
spec:
  replicas: 1
  selector:
    matchLabels:
      app: cloudflare-ddns
  template:
    metadata:
      labels:
        app: cloudflare-ddns
    spec:
      containers:
        - name: cloudflare-ddns
          image: alexmihai1984/cloudflare-ddns:2026.5.4
          imagePullPolicy: IfNotPresent
          volumeMounts:
            - name: config-volume
              mountPath: /application.yml
              subPath: application.yml
      volumes:
        - name: config-volume
          secret:
            secretName: cloudflare-ddns-secret
Let me give you an overview of this file. I won’t go into all the details, I’ll stick to the most important parts:
- We’re creating a
cloudflare-ddnsdeployment in thecloudflare-ddnsnamespace. - It will have a single replica (
replicas: 1). You should NOT increase this value for this service in particular, and in a general sense I wouldn’t recommend setting this any higher for any service in a homelab setup. In a production environment this helps with resilience (if an instance fails or is restarted), but it only works right if the service itself built with that in mind (stateless). - The
containerssection defines the image it needs to run andimagePullPolicy: IfNotPresentsays it should reuse a local image if already present. - The
volumestogether with thevolumeMountssections are used to mount the contents in the secret under theapplication.ymlkey under the/applicatoin.ymlfile path in the container.
All the label stuff is pretty interesting if you want to look into it, but pretty much outside the scope of this article.
Now commit and push the deployment to you Git repo.
Run it
Before running it in k8s, you should first stop it in Docker if you’re running it there.
Running everything through ArgoCD is my personal choice. So to be clear, you could also manually apply the previously created deployment file by running:
$ kubectl apply -f deployment.yml
If you want to use Argo, keep reading.
Log into your ArgoCD UI and under the Applications section, click the NEW APP button:

Fill in the information as follows:
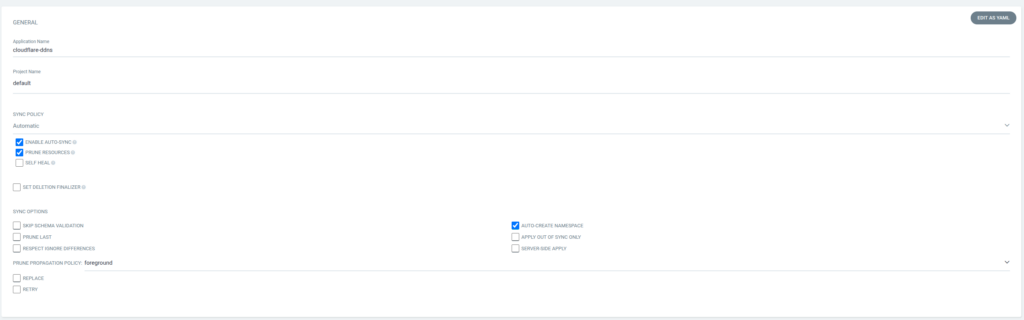
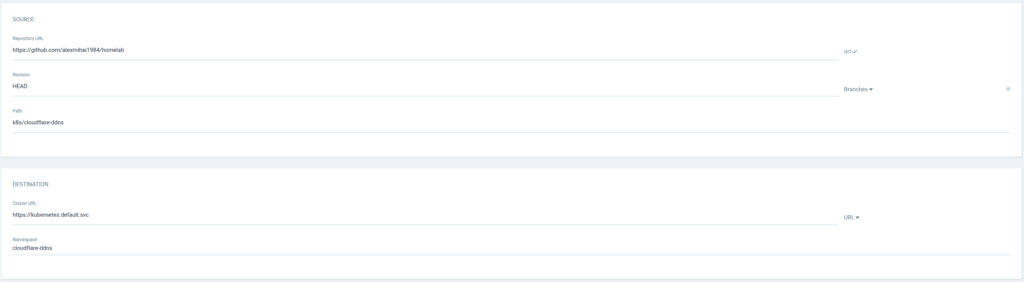
For Repository URL fill in the URL of the git repository you have pushed your deployment to. For Path fill in the path of the folder within that repo where the deployment.yml file lives. You can see in the screenshots what I use. You could also use mine, it’s going to work fine since the definition of the deployment is the same, but you run the risk of me potentially breaking your deployment if I make any changes.
Now the application should run. You can connect to your cluster and check the logs of the cloudflare-ddns pod using your preferred tooling. Personally I use FreeLens. You could also do:
$ kubectl logs -n cloudflare-ddns deployment/cloudflare-ddns

  .   ____          _            __ _ _
 /\\ / ___'_ __ _ _(_)_ __  __ _ \ \ \ \
( ( )\___ | '_ | '_| | '_ \/ _` | \ \ \ \
 \\/  ___)| |_)| | | | | || (_| |  ) ) ) )
  '  |____| .__|_| |_|_| |_\__, | / / / /
 =========|_|==============|___/=/_/_/_/

 :: Spring Boot ::                (v3.4.0)
You should see it logging:
Healthcheck successful, not doing anything
If you actually want to test it, you can change the DNS record of the domain you set as healthcheck in the config file to some invalid IP and after a while it should update it to your real IP.
Hope this helps, have fun clickity-clacking.
Leave a Reply